
Google Tag Manager
Google Tag Manager InformationsContents that you will learn in this section:
| What is Google Tag Manager (GTM)? |
| How to Create a New GTM Container |
| How to config GTM Tag in Site Studio/DaVinci |
| Exist a Standard GTM? |
| How to Check GTM Implementation? |
| How to manage everything inside GTM? |
| How to implement tags on GTM? |
| How to implement GA (Google Analytics) on GTM? |
| How to integrate cookie management with GTM? |
What is Google Tag Manager (GTM)?
Google Tag Manager is a tool that allows businesses to track and analysis all data related to your website/app, increasing the measurement precision, and opening a stack of opportunities for optimization purpose like Cross-funnel tracking,
Benefits of GTM:
- Enables team members to make updates and add new tags quickly and easily, without complex code changes to the site (relieving some pressure from development teams)
- Built-in debug features allow the team to test and debug each update prior to publication
- Version control to track changes or to roll-back to a former version
- Increased control over users and permissions management at country and global level
How to Create a New GTM Container
- In Tag Manager, in the Accounts view, click next to the relevant account name.
|
Account Name |

- Choose Create Container.
- Enter a descriptive container name and select the type of content: Web, AMP, Android, or iOS.
- 1. If setting up a mobile container, select whether you're using the Firebase SDK or one of the legacy SDKs.
- Click Create.
- Review the Terms of Service and click Yes if you agree to those terms.
- The container is now setup. However, it will not work until the code snippet for the container is installed on the platform.
- Grant access to global user with publish permissions
How to config GTM Tag in Site Studio/DaVinci
Follow the following flow in the development environment of the website:
WEBSITE ACCESS à MANAGE à CONFIGURATION à SYSTEM à GOOGLE TAG MANAGER à GTM ID
Exist a Standard GTM?
To facilitate the implementation of Google Tag Manager, a standard Container was created, which contains some pre-configured Tags, Triggers and Variables. It is only necessary to fill in the missing information of the other tools that will be integrated.
-
-
- Download the Standard Container
- In the top navigation, click Admin.
- In the Container section, click Import Container.
- Click Choose container file and select the file that you downloaded
- Under Choose workspace, click New and Save.
- Select Overwrite.
- Click Continue.
- Click Confirm.
-
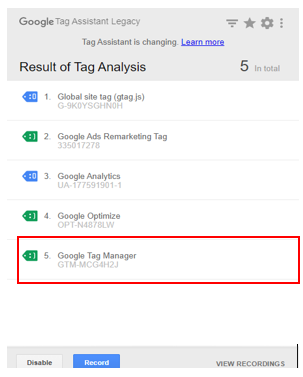
How to Check GTM Implementation?
In order to ensure the installed container is working properly, the simpler solution is to use Google Tag Assistant - a tool that may be used through a Google Chrome extension (accessible via this link on Chrome Web Store).
Another alternative is simply visiting the Tag Assistant site (https://tagassistant.google.com/) and following a few easy steps to add a domain and detect installed tags.
In the Tag Assistant, successfully installed tags with no conflicts will be shown with a green/blue icon - while tags that need troubleshooting will be shown in yellow/red according to the severity of the problem.
How to manage everything inside GTM?
Account and container permissions are controlled at the country level by the contacts listed below. Users requesting access will need to reach out to specified contacts with the following information:
- Name, position, and company
- The name of account(s) and container(s) to be granted access to • Reason for access
- Access needs (read only, edit, approve, publish)
Country Admin Contact Table
|
Country |
Contact |
Contact Email |
|
Global |
Henrique Nishisaki |
henrique.nishisaki-ext@ab-inbev.com |
|
Global |
Leonardo Franqui |
leonardo.franqui@ab-inbev.com |
|
Global |
Leonardo Vita |
leonardo.vita-ext@ab-inbev.com |
How to Grant GTM Access
- Add user to specified account, set user or admin permissions
- Set container permissions for user to control roles and access to specified containers
Adding a user to an account and setting container permissions:
To add users to a Tag Manager Account:
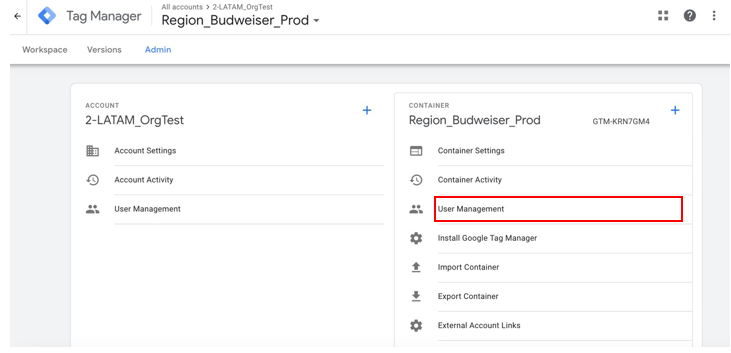
- Click Admin in upper left corner
- In the Account column, select User Management
- Click the + in the upper right corner
- Select Add New Users
- Enter one or more email addresses. ( Email needs to be organizational and must be linked to google Create your Google Account )
- Set Account Permissions. User is selected by default. See above for account access definitions.
- Set Container Permissions for each container that you would like the user to have access to.
- Default is set to None (no access to container)
- Change default by clicking on the desired container name and checking the box for the level of access the user should receive.
- Click Done to save edits.
- Click Invite. Each invited user will receive an invitation to use the container.
If a Tag Manager administrator has added a user to a Tag Manager account, that user will receive an invitation to access the account.
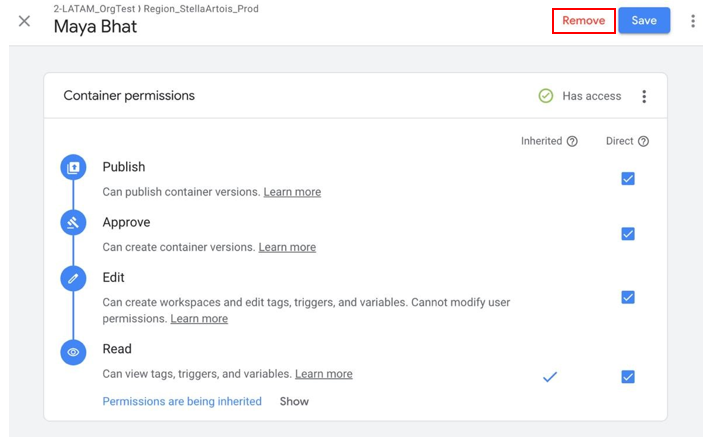
Removing a user:
If you wish to remove this user from access to the current container, click Remove from within a specified profile under User Management.
Requesting A New GTM Container
Container creation can be completed by Admins for a specified country. Requests for new containers should be submitted to Account Admins with the following information:
- Name, position, and company
- The name of account in which the container should be created
- Name of the container to be created
- Reason for creation
- Type of content container is for: Web, AMP, Android, or iOS.
How to Create a New GTM Container
- In Tag Manager, in the Accounts view, click next to the relevant account name
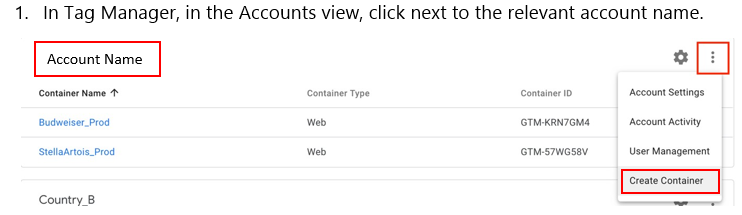
- Choose Create Container.
- Enter a descriptive container name and select the type of content: Web, AMP, Android, or iOS.
1. If setting up a mobile container, select whether you're using the Firebase SDK or one of the legacy SDKs.
- Click Create.
- Review the Terms of Service and click Yes if you agree to those terms.
- The container is now setup. However, it will not work until the code snippet for the container is installed on the platform.
- Grant access to global user with publish permissions
How to implement tags on GTM?
- Within the Tags section, click New in the upper right corner.
- Choose Tag Type.
- Complete setup for the selected tag type.
- Add a Trigger.
There are two ways to create a tag – use a Tag Template or create a Custom Tag.
- Tag Templates replace the javascript code snippets that will otherwise need to be manually added to the site. Each tag template provided in GTM has a unique input that connects it with the account on the corresponding vendor’s platform. For example, to use the Google Analytics template, the only input needed need is the property Tracking ID.

Tag Templates are found in the Featured section in the Choose Tag Type list. The full list of available Tag Templates can be found here.

- Custom Tags are for tags that are not yet supported natively by Tag Manager. There are 3 types of custom tags: image, HTML, or function tag.

How to implement GA (Google Analytics) on GTM?
For Google Analytics implementation we should pay attention to some setting to guarantee all the data and use the form.
Google Analytics ID
For the best use, create a better governance, and use the ID in other functions, we suggest to create a variable to be the Google Analytics ID:

Create Google Analytics Variable
To be create an easier implementation, we suggest to create a Google Analytics Variable, this permits that you call all the settings without re-do the setup each time:
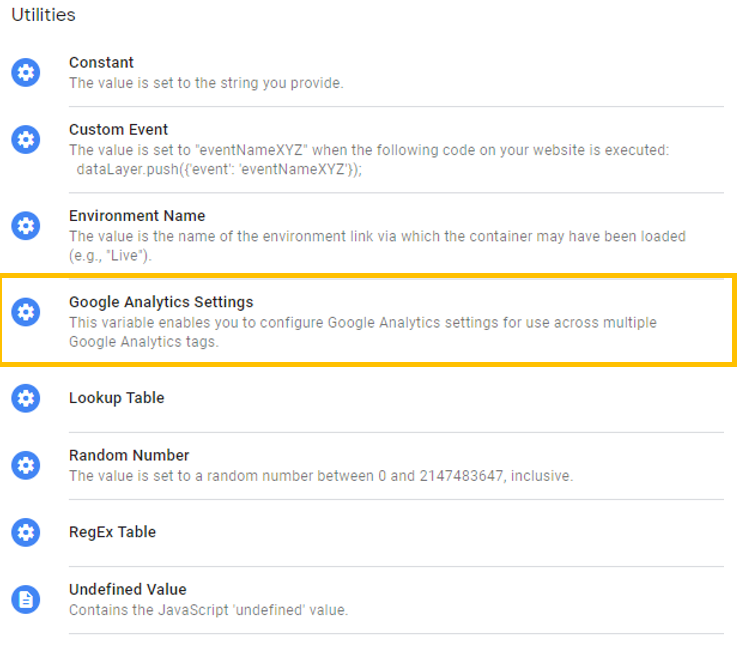
Inside this tag, you will find all the important setup for Google Analytics configuration:

Below we highlight important setups to be configurated:
- Tracking ID: this is the one that you create on the variable (previous topic)
- Cookie Domain: we suggest keeping the default (auto)
- Custom Dimension: consult the datalayer and Google Analytics implementation to further specification, but remember to create the variables and the define the index:

- Cross domain: If the GTM be implemented in many domains or the same Google analytics properties be in many domains that are connect, we strongly recommend to active the setup, just put all domain separated by comma (‘,’):

- Ecommerce: if the site will collect data from e-commerce structure, this feature must be turned-on. For details specification of datalayer structure for e-commerce consult the datalayer document.

Standard Event Recommendation
Our main suggestion to setup the events of Google Analytics is to create a generic tag that will cover all the standard events.
Basically, our standard event on datalayer for Google Analytics is identify a range of values: gaClick|GAEvent|promotionClick|checkout|removeFromCart|addToCart|productClick, so you just need to create a generic tag with this generic trigger.
All the fields on the setup of the tag must be the variables:

And for the trigger:

How to integrate cookie management with GTM?
Google Tag Manager (GTM) is a tool that allows you to manage and deploy tags (snippets of code or tracking pixels) on your website without having to modify your site code.
If you use Google Tag Manager (GTM) to inject cookies on your website and manage site content, you can set it up so that the scripts are controlled by the consent preferences choices selected by visitors.
This section of the guide explains how to set up GTM to take advantage of these changes
How it works
To pass data to Google Tag Manager, the Cookie Compliance tool uses Variables. It supports Data Layer Variables.
It adds a key named OnetrustActiveGroups with a value of a comma delimited string of the current active category ids as selected by the visitor (or the default setup). This key is re-populated on every page load once the script is executed.
This is the list of types of cookies and their ID values:
|
ID |
Cookie Type |
Definition |
|
1 |
Strictly Necessary Cookies |
These cookies are necessary for the website to function and cannot be switched off in our systems. |
|
2 |
Performance Cookies
|
These cookies allow us to count visits and traffic sources so we can measure and improve the performance of our site. |
|
3 |
Functional Cookies |
These cookies enable the website to provide enhanced functionality and personalization. They may be set by us or by third party providers whose services we have added to our pages. |
|
4 |
Targeting Cookies |
These cookies may be set through our site by our advertising partners. They may be used by those companies to build a profile of your interests and show you relevant adverts on other sites. |
|
5 |
Social Media Cookies |
These cookies are set by a range of social media services that we have added to the site to enable you to share our content with your friends and networks |
When a user updates their consent a dataLayer event OneTrustGroupsUpdated will be triggered. You will use this event when creating triggers to apply to your tags.
By creating a GTM Custom Variable and Triggers, you can make GTM tags only trigger when specific consent groups within OntrustActiveGroups are present.
To Create a New Variable
- Open your container in Google Tag Manager.
- Select the Variables tab from the main menu. The Variable screen appears.
- Create a new User-Defined Variable.
- Name the variable as OnetrustActiveGroups
- Set the Variable Type to Data Layer Variable under the Page Variable section.
- Set the Data Layer Variable Name to OnetrustActiveGroups.
- Press the Save button.

Triggers
In GTM, triggers prompt tags to fire or not fire on certain criteria. You may already have a variety of different triggers applied to your tags.
As part of the Cookie Compliance integration with GTM you are going to create a trigger associated with each cookie category.
When you apply these triggers to your tags, this will prompt your tags to fire or not fire based on the Cookie Category being active or the consent given by the user.
You will need a separate trigger for each of the Cookie Categories that you will be blocking cookies under. For example, you may have a trigger called “OneTrust_Block Performance Cookies”, which has a category Id 2 and contains the cookies set by your Google Analytics tag.
Each trigger needs to be in line with the category ids that are set in your cookie consent application.
To create an Exception Trigger
You can set up an exception trigger to fire the script if a category of cookies is not active.
You will only want to use an exception trigger if you already have a different firing trigger set up on your tag.
For example, set a trigger to fire when OneTrust Active Groups does not contain ID = 2 (where ID = 2 is the id for performance cookies). Apply this blocking trigger as an exception to tags in this group.
- Select the Triggers tab from the main menu. The Triggers screen appears.
- Press New. The Trigger Configuration screen appears.
- Create a new trigger and name it accordingly: Trigger name = Partner Name _Trigger Rule
Exemple: OneTrust_Block Performance Cookies; OneTrust_Block Funcional Cookies
- Press the Trigger Configuration and set the Trigger type to Custom Event.
- Set the Event name to .*. This event applies to all events and will allow the exception trigger to override the event that is in the firing trigger.
- Select the Use regex matching box
- Set the Trigger to fire on Some Custom Events.
- In the conditions, in the first field selects and the configurable variable previously set "OnetrusteActiveGroups".
- As a condition select "does not match RegEx."
- And in the last field put the Id number between comma for the cookie type. Ex : ,2, .

- Save the Trigger.
- Repeat this process for the remaining Cookie Categories.
- Apply the Trigger to Tags as an Exception.
To create an Another way to Fire tags
After updating the tag triggering method using the cookie rule to set which type of tag will be fired according to the user's choice, you will need to add a new way of shooting to the page view tags.
This should be done due to times when the user accepts cookies after loading the page, in this case, if there is no other way to shoot the tags will only be fired on the next screen loading.
To avoid this problem, you will need to create a new way of triggering through the cookie update event, for this:
- Select the Triggers tab from the main menu. The Triggers screen appears.
- Press New. The Trigger Configuration screen appears.
- Create a new trigger and name it as: OneTrust_GroupsUpdate.
- Press the Trigger Configuration and set the Trigger type to Custom Event.
- Set the Event name to “OneTrustGroupsUpdated”.
- Set the Trigger to fire on All Custom Events.
- Save the trigger.

- Add this new trigger to the tag that was previously fired only in the pageview.

After performing this setting, the tag must be configured to avoid duplicate tag firing. To accomplish this setting:
- Select the Tag
- Click advanced Settings
- In the Tag Firing options field, select the One per page option.
- Save the trigger.
- Do this setting for all tags that use the page load to be fired.
To facilitate these settings, you can download the container that already contains ready-made templates of Tags, variables, and triggers. (STANDARD GTM)
