
Cookie Consent Module
What is the cookie consent and how to use it in my website.Contents that you will learn in this section:
| What is Cookie Consent? |
| What tool we use for Cookie Consent? |
| What is the Global orientation for Cookie Consent? |
| How to access Cookie Consent Module |
| How to implement |
| How to setup the preferences on the site |
| What is One Trust Tag and how to implement it? |
| What is OneTrust Cookie Auto-Blocking |
| How to Installing OneTrust Tag in Google Tag Manager |
| How to be Cookie Compliance Integration with Google Tag Manager |
| How to Update your Data Privacy Policy |
| How to Test Your Cookie Blocking Implementation |
What is Cookie Consent?
Under laws like the GDPR and LGPD (Cookie Law), users must grant their consent before cookies can be deployed or installed on their computer.
The process of collecting cookie consent includes clearly and explicitly informing the user of the cookies you run on your site, their purposes, the user’s right to grant or refuse consent, and how they can exercise that right.
What toll we use for Cookie Consent?
The tool is that we use is the One Trust. With the One Trust it is possible to create the Cookie Banner, responsible for capturing the user's consent information.

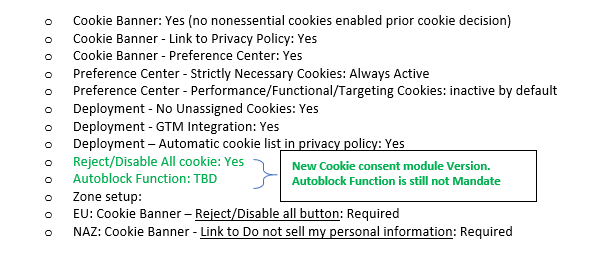
What is the Global orientation for Cookie Consent?
Below criteria provided in the screenshot should be compliant for the all the websites created
How to access the Cookie Consent Module?
To get access in One Trust Cookie Consent module, send an e-mail to GlobalServiceDesk@ab-inbev.com with the following information:
• First Name:
• Last Name:
• E-mail ID:
• External / Internal:
• Reason for Access (what activity to be performed):
• Zone:
• ABI Sponsor (Internal) ID (For third party Users):
How to implement
To implement the cookie banner on your website, follow the steps below:
- Select the theme you want to use to configure the cookie banner.

- Click the templates button. The Cookie Banner editor appears.
|
|

How to setup the preferences on the site
You’ll need configure it to match the styling and AB-InBev’s legal requirements. To complete it, follow the steps below:
- Always make sure you are editing the Cookie Banner in the proper default language for your country.
- In Layout menu, choose Bottom bar dark theme:
- In Styling menu, choose the Button color that fits your branding:

***Note: you’ll need to inform the color in hexadecimal code. You can find a reference of the color codes here.
- In Content menu, fill the fields with your approved legal text.

- Still in Content menu, turn on Cookie policy link, Cookie settings button and Accept cookies button options:

***Note: add the approved Privacy and Cookie link for your website in policy link field.
- Still in Content menu, Click on Button Set where the behavior the buttons the banner is established.
Note: You can add the “REJECT ALL” button to the banner,

- In the Behavior menu, configure the cookie banner behavior, here you can decide if the template used for a region requires banner interaction or not.

- You can also manage the languages you want your cookie banner is presented. To select it, click the Manage Languages button in the header:

- The Manage Languages modal appears.

- Select the checkboxes for the language-culture combinations for which you want to add banner options.
- Click the Save button.
What is One Trust Tag and how to implement it?
Cookies script tags are how you will integrate the cookie banner with your websites.
To publish One Trust tag
To publish the Cookie Consent module and prepare it to be deployed in your website, follow the steps below:
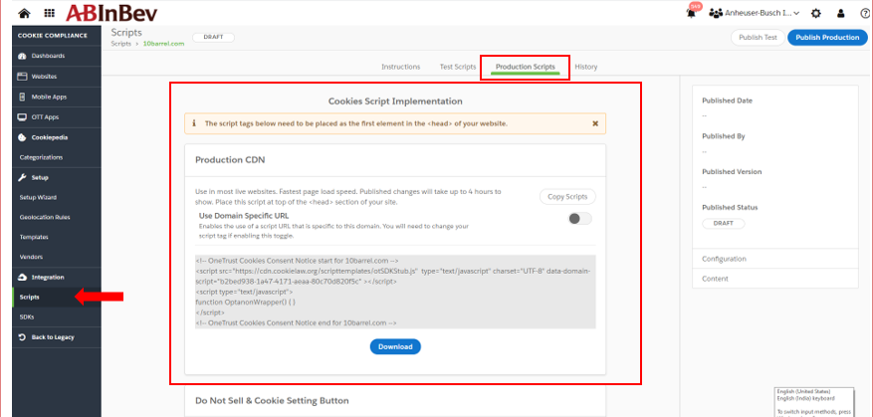
- On the Cookie Consent menu, select Script Integration. The Script Integration screen appears:
- On Settings, by default, you can turn off Use One Trust jQuery Script option:

***Note: If your site uses jQuery older than 1.3, you should enable this option. Reference to the developer of your website if you are not sure about the jQuery version for your website.
- Dynamic language detection localizes content for site visitors based on the language-culture setting in their browser. You can enable the Language Detection option and in Default Language field, select the language you want the cookie banner to show when it detects a language for which a cookie banner is not set up:

- After setting all the option, click on Publish:
|
|
zz
- The Publish screen appears:
|
|

- Review the fields and click the Submit button. Your banners and scripts are ready to be deployed.
Installing scripts in OneTrust
|
|


|
|
|
Click the ‘Publish Test Scripts’ button |


Click on Publish Production button, click on confirm, the below screen appears. Enable autoblocking functionality for your website:

Click on the copy scripts in the production CDN script

What is OneTrust Cookie Auto-Blocking?
OneTrust Cookie Auto-Blocking can be used to automatically block cookies from being set on site visitor devices. Auto-Blocking automates the process of setting your cookies, scripts, and tags to respond to the preference selected by site visitors.
Instead of using a tag manager or manually adding type="text/plain" for JavaScript type re-writing, you can simply turn on a setting for your banner and preference center script that will automatically block the categorized cookies on you site.
How to installing OneTrust Tag in Google Tag Manager
For Cookie Consent module to take effect, you need install the generated script in your website’s container on Google Tag Manager and publish a new version of your website’s container.
Installing One Trust Tag using GTM
To install Cookie Consent module properly, follow the steps below:
- In Script Integration menu, copy the Production CDN code:

***Note: The Production CDN tag has the fastest page-load speed but can take up to 4 hours for changes to appear on the banner. If you have a high volume of traffic from globally distributed visitors, you should use the Production CDN tag. This creates multiple local copies of the tag and automatically downloads the version nearest to the visitor, offering an advantage in terms of speed. Because there are multiple copies, changes to the script can take time to update in all locations. Some visitors may see an older version of the banner for a period of time after you publish a new version. The Staging/Test script is intended for use in staging/development environments. It will work on live URLs but takes longer to load than other scripts.
- Now, on Google Tag Manager, search for your website’s Account and Container Name:

- On your Container’s workspace, select Tags menu. The Tags screen appears:

- On Tags menu, click the New button:

- Change the tag name following Google Tag Manager name convention provided by the Global Team, then click Tag Configuration menu. The tag type screen appears:

- Select Custom HTML in the Custom section:

- Paste the copied Production CDN code from One Trust Scrip Integration menu in HTML section: In GTM custom HTML tick ‘Support document.write’ is required for the banner to show

- Then click on Advanced Settings menu:

- On Tag firing priority, the higher the number the higher the priority

- Now, click Triggering menu. The Choose a trigger menu appears. Select All Pages:

- Click Save Button.
Publishing a new container version:
After installing One Trust tag, you will need publish a new version of your website’s container in Google Tag Manager.
- On Default Workspace screen, click on Submit button. The Submit Changes screen appears:

- Fill in the Version Name and Version Description according Google Tag Manager governance guide, then click Publish button. The Container Version Description screen appears:

- Fill in the fields with the proper version name and description, the click Continue button:

- GTM will publish a new version:


- You can test the Cookie banner on your website:

How to be Cookie Compliance Integration with Google Tag Manager
Google Tag Manager (GTM) is a tool that allows you to manage and deploy tags (snippets of code or tracking pixels) on your website without having to modify your site code.
If you use Google Tag Manager (GTM) to inject cookies on your website and manage site content, you can set it up so that the scripts are controlled by the consent preferences choices selected by visitors.
This can be more efficient than using the standard helper methods described in the Client-Side Cookie Management section of this guide. However, there are some differences in behavior because of how GTM works.
This section of the guide explains how to set up GTM to take advantage of these changes.
How it works
To pass data to Google Tag Manager, the Cookie Compliance tool uses Variables. It supports JavaScript Variables and Data Layer Variables. We recommend using the GTM Data Layer and Data Layer Variables.
Cookie Compliance uses the existing dataLayer object or creates a new one if it doesn’t already exist. If your site creates a dataLayer object, ensure that this does not overwrite the one Cookie Compliance creates.
It adds a key named OnetrustActiveGroups with a value of a comma delimited string of the current active category ids as selected by the visitor (or the default setup). This key is re-populated on every page load once the script is executed.
For example, the data contained in the value might be ,2, 3, 4,.
When a user updates their consent a dataLayer event OneTrustGroupsUpdated will be triggered. You will use this event when creating triggers to apply to your tags.
By creating a GTM Custom Variable and Triggers, you can make GTM tags only trigger when specific consent groups within OntrustActiveGroups are present.
How to Update your Data Privacy Policy
In order to match One Trust cookies with you Privacy Policy, you will need insert a piece of code directly into the Privacy Policy URL. To do it, follow the steps below:
On the Cookie Consent menu, select Script Integration. The Script Integration screen appears. Make sure you are editing the right website in the right ABI Zone:
- You will find under Cookie Setting Button section and Cookie List section the codes you need insert in the Privacy Policy URL:

- After implementing it, you will see a Cookie Setting button in your Privacy Policy URL, like this one:

- Also, you can find a cookie table, like this one:

***Note: The best practice is to implement it using Google Tag Manager. Inside Google Tag Manager you can define these tags to be fired just on your Privacy Policy URL, following Google Tag Manager standards. Please refer to your Google Tag Manager admin for any question or concern. Also, if you need further support, contact Google Tag Manager Global Admin: Bruno Carneiro (bruno.carneiro@ab-inbev).
How to Test your Cookie Blocking implementation
- Open Google Chrome and navigate to the webpage to be tested. Click the Accept All Cookies button on your banner.
- Right click on the page and select Inspect Element (or press Ctrl+Shift+I) to open the Developer Pane.
- Click on the Application tab and expand the Cookies section.
- Select your current domain to see the currently active cookies.

- To clear the active cookies, select Clear Storage from the Applications tab.
- Make sure the Cookies check box is selected and click the Clear Site Data button.
